Urban planning
Switch to the Top (Plan) viewport and maximize it.

The pCon.planner offers you two ways to create rooms. Firstly, you can create a room from individual walls, and secondly, you can draw a complete room instantly using the „Rectangular Room“ function.
Rectangular room
To draw a rectangular room, use the identically named marked function. To cancel a drawing operation, press the Esc key or select "Cancel" from the context menu (right-click).
Individual rooms
Using the example of a wall, the drawing process is explained:
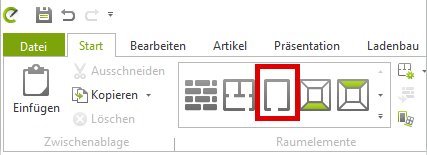
- Click the Wall button, which you can find in the Start tab (Room Elements group).
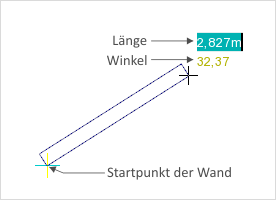
- Move the cursor to the workspace above (floor plan view).
- This changes its appearance, as can be seen in the image at the bottom right. With a click in the workspace, you set the starting point for drawing (in this case, the wall).
- By moving the mouse, you influence the object's dimensions.
- Another click ends the drawing process.
You can also use specific values and units of measurement to draw objects, which you can carry out by typing on the keyboard.
When a wall is drawn, the width can be entered by inputting a number.
Define store
Setting an angle in visual-STORE can be done just as manually as determining wall width. Simply select the wall element with the desired angle, and the interior and exterior angles will appear. These can now be changed as needed.