Licenses – Device Licenses
Overview
- Overview
- License activation
- License transfer
- Transfer of the license to the same system
- License Management
- Collect license information
- Borrowing licenses
License activation
You will receive the license key after purchase. The dialog will open when you first start your software. Activation. Please enter your product key here. If your 30-day demo license has already expired, you can find the activation dialog under:
Start->All Programs->pCon Tools->License Management->Activate
License transfer
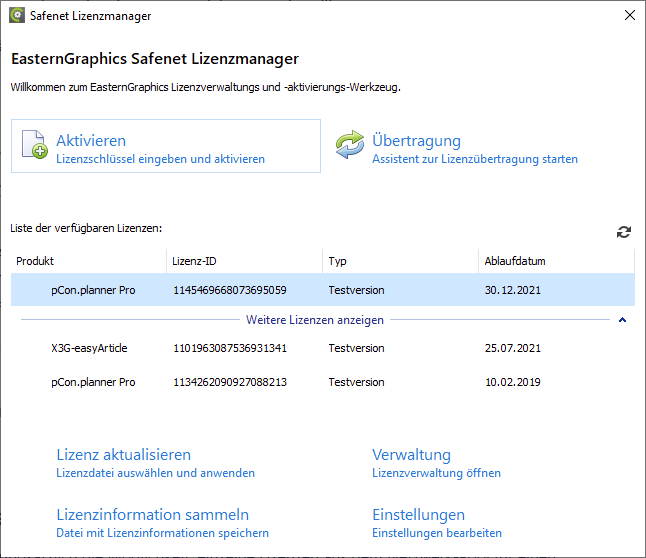
If you want to transfer your license from one device to another, for example, after purchasing a new computer, you can do so via EasternGraphics License Manager tun. You open this via the Windows Start menu. Follow this path:
Start->All Programs->pCon Tools->License Management
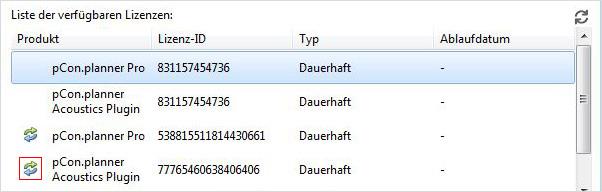
Whether a license is transferable can be identified by the icon, which is highlighted in red in the illustration above. The Transfer button in the upper right area of the dialog takes you to the license transfer wizard. Here you will be guided through the steps necessary to transfer your license from one device to another. Here's how to proceed: For a transfer, the source system must still be functional.
Start on the computer you will be using the application on in the future.
-
-
-
- Start the license manager. You can access it via the Windows Start menu (Start -> All Programs -> pCon Tools -> License Management).
- With a click of the button Transmission open the dialog License Transfer Assistant.
- The entry "Save Information File" creates a file with information about the target system.
- In the next step, you need to transfer this file to your source system, i.e., the computer you have been using so far. You can send the file by email, for example.
Now continue working on the computer where the license is currently installed. - Open after a click on Load information file the file that was generated in step 3.
- Select from the list below Select license for transfer The license you want to transfer.
- One click on License file Save creates a file that you can send to your target system, for example via email.
- Call the license file that was created in step 7 after clicking the button Update license on.
-
-
Your license transfer is now complete. You can continue working on your new system with your old product key. Please ensure that the license is not being used by an active EasternGraphics application. If the license is in use, please close the application before generating the file via Save License File. Warning: The license will no longer be available on the source system after step 7.
Transfer of the license to the same system
It may be necessary to reinstall your license file on the same computer, for example, if you replace hardware components or install a new operating system. In these cases, the license must be temporarily stored on another system.
License Management
In the lower area of the License Managers You have various options available to you:
- The point Update license allows you to update your license after a change in license terms.
- About Gather license information Can you save a file with the current license information, for example, to send to support.
- The button Administration takes you to advanced license settings.
- The area Settings allows you to activate via a proxy.
Collect license information
-
-
-
- Open the License Manager under Start->pCon Tools->License Management
- In the License Manager, click on the license for which you need the license information.
- In the lower section, select "Collect license information"
- Save the file with the .c2v extension
-
-
Borrowing licenses
Network licenses fundamentally offer the ability to temporarily borrow individual licenses from the network pool for a limited period. This borrowing can be done online or offline using the Admin Control Center. Borrowed licenses can be used outside the network. On the respective systems, they behave like time-limited single-user licenses that automatically become available again in the network pool after the borrowing period expires. Use the ACC for this purpose. The Admin Control Center (ACC) is the management tool for the license management system and is automatically available after installing pCon.planner PRO or the server installation package. The Admin Control Center can also be started without using the Safenet License Manager. To do this, simply provide the target address http://localhost:1947 can be entered in the browser. Alternatively, you can access it via the License Manager → Administration.
Server Configuration (One-Time)
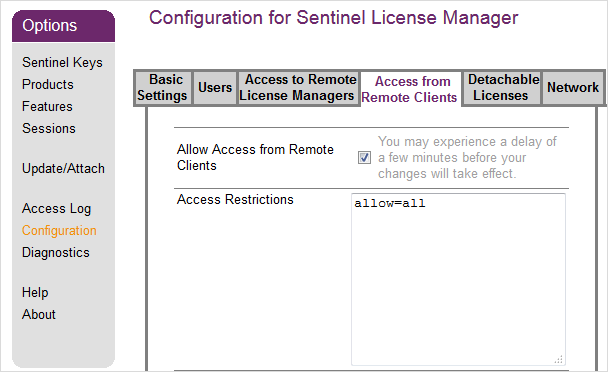
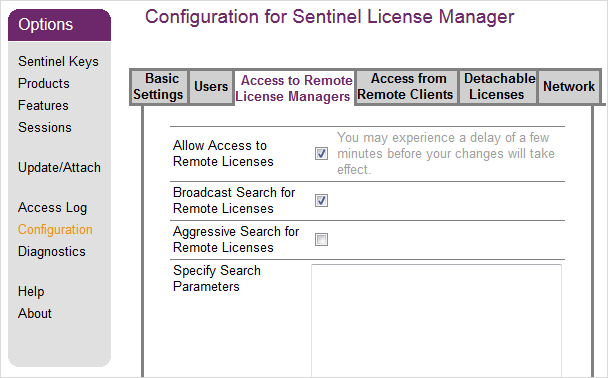
First, remote client computer access must be permitted on the server. This is done by selecting the Allow Access from Remote Clients
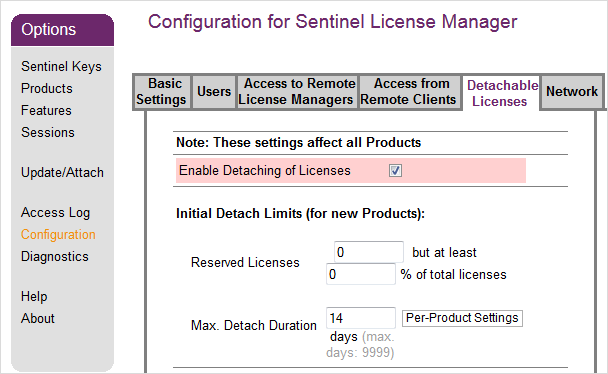
After that, we need to discuss Enable License Detachment The borrowing can be allowed. In addition, the maximum borrowing duration and the number of non-deportable reserve licenses can be defined:
Online outsourcing requires a connection to the network license server, and the process can be fully controlled via the client. The server is located in the Admin Control Center of each client computer under Products listed and the rental process is through the button Remove started.
Client Configuration (One-Time)
Access to the server and the network license must be enabled on the individual clients:
License borrowing or checking out can be done online or offline. With the first method, borrowing is initiated on the client computer through online access to the network license pool on the server. The borrowing process is fully automated. Offline borrowing is done through the manual exchange of checkout files (*.R2H / *.H2R).
Note: Online offloading is convenient because the license is automatically retrieved from the server and set up on the client. However, it requires a connection between the server and the client at the time of borrowing.
Online Loans

Note: The red arrow next to the product name on the server implies that license outsourcing is possible. Furthermore, the "Available" column shows the licenses available for borrowing.
In the following dialogue, the client can set the outsourcing method (online) and the loan period duration. Via the button Detach and Attach the fully automatic borrowing process will then be started.
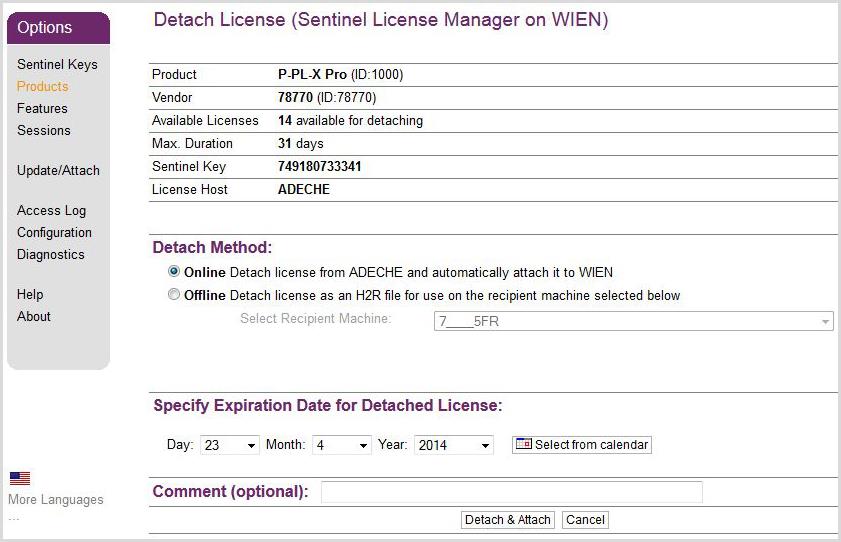
Upon successful completion, a corresponding message will be displayed, and the license will additionally appear in the section Products listed in the customer account.
Offline Loans
Offline offloading is applied when a direct connection cannot be established between the client and server. The offloading process is based on the exchange of special files. In contrast to the online version, it is initiated directly on the network license server:
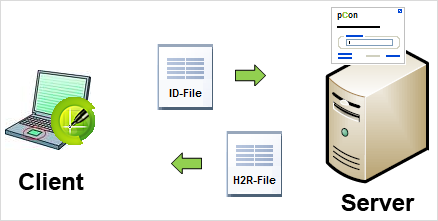
Offline deployment is again available in the server's Admin Control Center via the button Remove started at the network license in the product list. When outsourcing offline, a recipient client must always be selected from a list of client IDs. If the client is not listed among the recipient machines, you must first go to the Admin Control Center (menu item: Diagnostics -> Create ID File) a client created an ID file and on the server under Update / Attach be read in. Afterward, the client will be available in the server's selection field. An H2R (Host-to-Recipient) file can be generated.
